Using AFL and libFuzzer
This post is based on text from f-secure blog.
The tools for bug hunting have been adopted fuzzing as a very effective technique. In this text, we keep our focus on tools such as American Fuzzy Lop (AFL), LLVM libFuzzer.
Using AFL
For the next steps, we adopted a Linux docker container, aiming to keep a pattern for our commands.
-
Install docker, checking out this LINK
-
Create our container:
foo@bar:~$ docker run -it --name afl ubuntu:18.04 /bin/bash
Unable to find image "ubuntu:18.04" locally
18.04: Pulling from library/ubuntu
423ae2b273f4: Pull complete
de83a2304fa1: Pull complete
f9a83bce3af0: Pull complete
b6b53be908de: Pull complete
...
root@a3cbc72a4874:/#
- Install AFL and get the source code of libxml2-utils
root@a3cbc72a4874:/# apt-get update
root@a3cbc72a4874:/# apt-get install -y afl
root@a3cbc72a4874:/# cd home
root@a3cbc72a4874:/# cp /etc/apt/sources.list /etc/apt/sources.list.bkp
root@a3cbc72a4874:/# sed -Ei "s/^# deb-src /deb-src /" /etc/apt/sources.list
root@a3cbc72a4874:/# apt-get update
root@a3cbc72a4874:/# apt-get source libxml2-utils
- We configure libxml2 build to use AFL compilers and compile the xmllint utility
root@a3cbc72a4874:/# apt-get install build-essential -y root@a3cbc72a4874:/# apt-get install automake -y root@a3cbc72a4874:/# apt-get install zlib1g-dev -y root@a3cbc72a4874:/# apt-get install pkg-config -y root@a3cbc72a4874:/# apt-get install libtool -y root@a3cbc72a4874:/# cd libxml2-2.9.4+dfsg1/ root@a3cbc72a4874:/# ./configure CC=afl-gcc CXX=afl-g++ # in case of error, try run ./autogen.sh root@a3cbc72a4874:/# make xmllint ... afl-as 2.52b by <lcamtuf@google.com> [+] Instrumented 18 locations (64-bit, non-hardened mode, ratio 100%). CC schematron.lo afl-cc 2.52b by <lcamtuf@google.com> afl-as 2.52b by <lcamtuf@google.com> [+] Instrumented 566 locations (64-bit, non-hardened mode, ratio 100%). CC xzlib.lo afl-cc 2.52b by <lcamtuf@google.com> afl-as 2.52b by <lcamtuf@google.com> [!] WARNING: No instrumentation targets found. CCLD libxml2.la afl-cc 2.52b by <lcamtuf@google.com> ar: `u' modifier ignored since `D' is the default (see `U') CCLD xmllint afl-cc 2.52b by <lcamtuf@google.com> - Now we create a sample file (to run AFL fuzzing) with content <a></a> for AFL to start with and run the afl-fuzz.
root@a3cbc72a4874:/# mkdir in
root@a3cbc72a4874:/# echo "<a></a>" > in/sample
# some flag to skip erros to run afl in docker, more details at https://github.com/mirrorer/afl/blob/master/docs/env_variables.txt
root@a3cbc72a4874:/# export AFL_I_DONT_CARE_ABOUT_MISSING_CRASHES=1
root@a3cbc72a4874:/# export AFL_SKIP_CPUFREQ=1
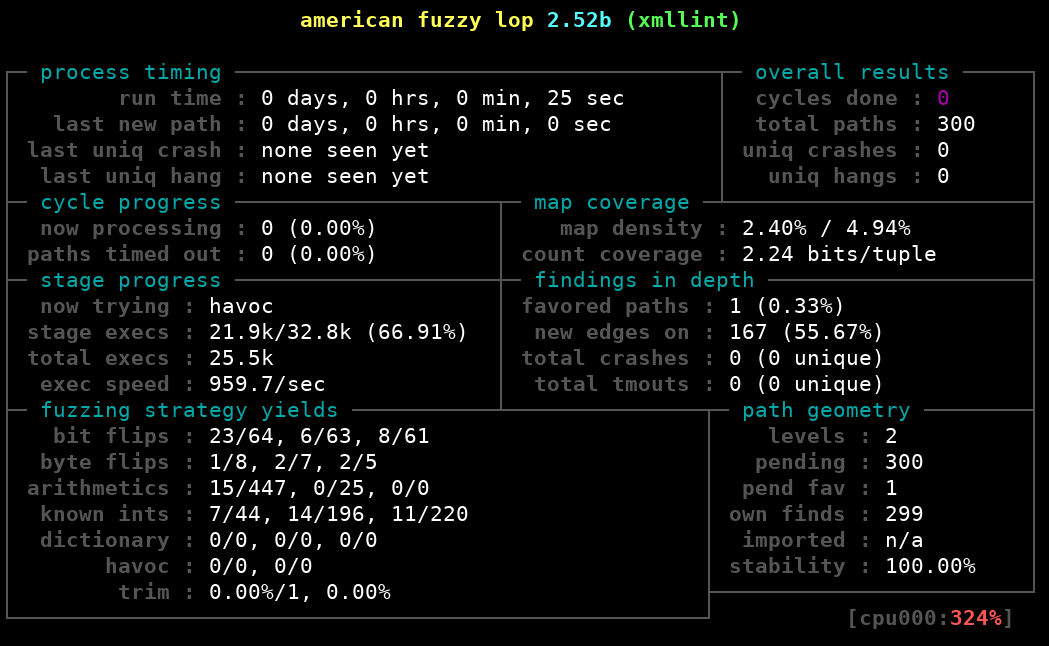
root@a3cbc72a4874:/# LD_LIBRARY_PATH=./.libs/ afl-fuzz -i ./in -o ./out -- ./.libs/xmllint -o /dev/null @@

AFL will continue fuzzing indefinitely, writing inputs that trigger new code coverage in ./out/queue/, crash triggering inputs in ./out/crashes/ and inputs causing hangs in /out/hangs/. For more information on how to interpret the AFL’s status screen, see: http://lcamtuf.coredump.cx/afl/status_screen.txt
Fuzzing with LLVM libFuzzer
- Let’s now adopting LLVM libFuzzer. To start fuzzing, you’ll first need to introduce a target function, LLVMFuzzerTestOneInput, that receives the fuzzed input buffer from libFuzzer. The LibFuzzer implementation works by creating a custom entry point, which contains an array of bytes (of uint8_t). The code looks like this.
extern "C" int LLVMFuzzerTestOneInput(const uint8_t *Data, size_t Size) {
 DoSomethingInterestingWithMyAPI(Data, Size);
 return 0; // Non-zero return values are reserved for future use.
}
For fuzzing libxml2, Google’s fuzzer test suite provides a good example fuzzing function.
// Copyright 2016 Google Inc. All Rights Reserved.
// Licensed under the Apache License, Version 2.0 (the "License");
#include <string>
#include <vector>
#include "libxml/xmlversion.h"
#include "libxml/parser.h"
#include "libxml/HTMLparser.h"
#include "libxml/tree.h"

void ignore (void * ctx, const char * msg, ...) {}

extern "C" int LLVMFuzzerTestOneInput(const uint8_t *data, size_t size) {
 xmlSetGenericErrorFunc(NULL, &ignore);
 if (auto doc = xmlReadMemory(reinterpret_cast(data), size, "noname.xml", NULL, 0))
 xmlFreeDoc(doc);
 return 0;
}
- We make our work simple, we adopt the code from GitHub repo. This way, we start from the last step with AFL
root@a3cbc72a4874:/home/libxml2-2.9.4+dfsg1# cd ..
root@a3cbc72a4874:/home# apt-get install git -y
root@a3cbc72a4874:/home# git clone https://github.com/GNOME/libxml2 libxml2
root@a3cbc72a4874:/home# cd libxml2
-
Recent versions of Clang (starting from 6.0) include libFuzzer, and no extra installation is necessary.
-
In order to build your fuzzer binary, use the -fsanitize=fuzzer flag during the compilation and linking. In most cases, you may want to combine libFuzzer with AddressSanitizer (ASAN), UndefinedBehaviorSanitizer (UBSAN), or both. You can also build with MemorySanitizer (MSAN), but support is experimental:
root@a3cbc72a4874:/home/libxml2# apt-get install clang-6.0 -y
# dependece of libxml2
root@a3cbc72a4874:/home/libxml2# apt-get install python-dev -y
- Setting up FLAGS to build libxml2. Here you could explore different kinds of coverage-guided (using, clang coverage), which tries to maximize the code coverage of a program. For example, the inline-8bit-counters option from LLVM (SanitizerCoverage) for code coverage instrumentation built-in, where the compiler will insert inline counter that should be incremented on every edge.
root@a3cbc72a4874:/home/libxml2# export CXXFLAGS="-fsanitize=address,undefined -fsanitize-coverage=edge,indirect-calls,trace-pc-guard,trace-cmp"
root@a3cbc72a4874:/home/libxml2# export CXX="clang++-6.0"
root@a3cbc72a4874:/home/libxml2# export CFLAGS="-fsanitize=address,undefined -fsanitize-coverage=edge,indirect-calls,trace-pc-guard,trace-cmp"
root@a3cbc72a4874:/home/libxml2# export CC="clang-6.0"
root@a3cbc72a4874:/home/libxml2# export LDFLAGS="-fsanitize=address,undefined -fsanitize-coverage=edge,indirect-calls,trace-pc-guard,trace-cmp"
- Building LIBXML2
root@a3cbc72a4874:/home/libxml2# ./autogen.sh
root@a3cbc72a4874:/home/libxml2# make
- Now we need to write the libfuzz test, then we adopt from Google’s fuzzer test suite.
root@a3cbc72a4874:/home/libxml2# apt-get install wget -y
root@a3cbc72a4874:/home/libxml2# wget https://raw.githubusercontent.com/google/fuzzer-test-suite/master/libxml2-v2.9.2/target.cc
root@a3cbc72a4874:/home/libxml2# $CXX $CXXFLAGS -std=c++11 target.cc -Iinclude -L.libs -lxml2 -fsanitize=fuzzer -o libxml-fuzzer
- Now we are ready to run our fuzzer.
root@a3cbc72a4874:/home/libxml2# mkdir ./output
root@a3cbc72a4874:/home/libxml2# ./libxml-fuzzer ./output/

- All inputs that trigger new coverage are stored as sample files in ./output. As libFuzzer runs in-process, if a bug is found, it saves the test case and exits. For more information on how to interpret the output to see: http://llvm.org/docs/LibFuzzer.html#output